Screen: Compile Driver

Source code of fbusb link: https://github.com/Vonger/vocore2/tree/master/utils/fbusb

Directly Compile in Linux(raspberry pi)

This is tested on raspberrypi, it should be also working on another Linux system. Please go to fbusb/src folder then run this command.

make -C /usr/src/linux-headers-$(uname -r ) M=$PWD modules

After this command, you will get fbusb.ko

Cross-Compile for OpenWrt in MacOS

Cross compile is similar. For example, I want to compile the driver for the VoCore on my Macbook, I will need to go to fbusb driver folder first, then run this command:

make -C /Volumes/OpenWrt/build_dir/target-mipsel_24kc_musl/linux-ramips_mt76x8/linux-4.14.195 M=$(PWD) CROSS_COMPILE=mipsel-openwrt-linux- ARCH=mips

This path /Volumes/OpenWrt/build_dir/target-mipsel_24kc_musl/linux-ramips_mt76x8/linux-4.14.195 is my Linux header path, You need to change it to yours.

VoCore Screen: Test on Windows

VoCore Screen is mainly designed for embed Linux, so it is easy to work on Linux or Unix(MacOS), but for windows, it is not that smooth. Windows do not have libusb support directly, so we have to use third party driver to achieve that, like libusbK.

Recently pretty much people use this screen for car race simulator on Windows, so I think it is necessary for me to write a tutorial to show how to fast test if the screen work normal under Windows OS.

First, we need install libusbK for Windows

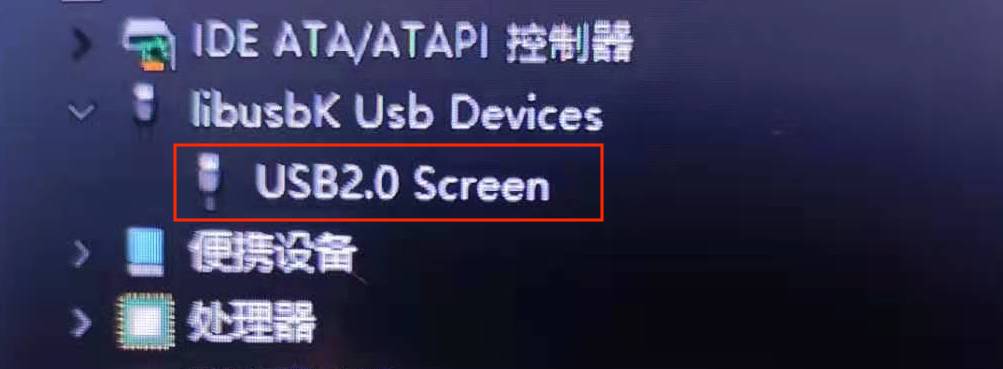
We already have it in our windows SDK, you can download it at vocore.io/screen.html, or use this directly link here: http://vonger.cn/misc/screen/v2touch-win64.zip, uncompress it and install the libusbK driver, you can find the device “USB 2.0 Screen” at your “Device Manager”.

Second, try our new test app in SDK.

In v2touch-win64.zip, there is one folder named example, used to test the screen.

And we have a test data, frame.dat. So we can directly run send_frame in the example folder in windows command line.

send_frame frame.dat

Then your screen will display the test picture. Test picture should be 480×800 size and 16bit RGB format BMP, remove 139 byte BITMAP header, raw data.

Other Commands Usage

send_frame

  • usage: send_frame [frame data file]
  • used to send one frame(bmp 16bit format data without bitmap header) to screen.
  • example: send_frame frame.dat

read_touch

  • usage: read_touch
  • used to read touch screen position and press status, no parameter.

send_cmd

  • usage: send_cmd [cmd] [param]
  • used to send command to screen, control screen rotated or backlight.
  • example: mirror by axis x,y [0,1,2,3] to mode1 send_cmd m 1
  • example: set backlight [0~255] to 120 send_cmd b 120

VoCore Screen: Upgrade

From last year Sep.1, we meet global chip shortage. Recently some chips price increase to incredible level. My chip provider told me, currently STM32F103 price is around 72CNY/pcs(11USD/pcs) compare to early of last year only 3~5CNY. Another network chip IP101G, from 0.8~1CNY to 10CNY. ๐Ÿ™ This is really crazy.

PS: Lucky, I use Gigadevice MCU, pin to pin STM32 but need to recompile firmware. Its price increased 10%~15%, compare to STM32 chip, looks like it is reasonable and acceptable.

For our production VoCore2 and camera, we have enough stock, but screen driver chip now have problem. The chip factory give me 25~30 weeks lead time, that is over half year. We have to change current screen plan.

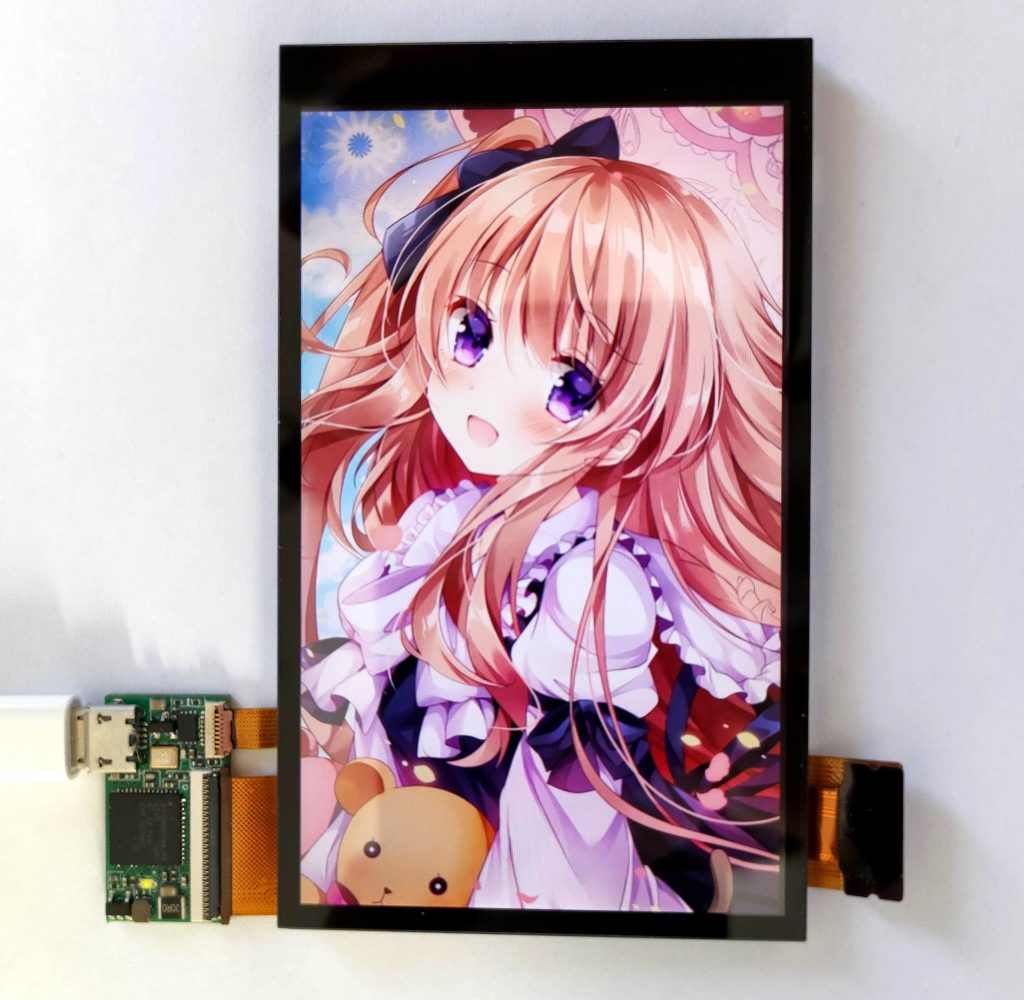
New screen is from Toshiba, better color than our old one. In order to compatible with old design, we add a FPC to convert its connector. For order later than Feb.9, we will all ship this screen. In software level they are compatible.

One slight difference, old screen once power on will show a white screen, this new one show black screen as default.

Screen size is almost same as old version(around 0.5mm smaller for both sides) also FPC is bendable, so this design should be compatible to most old screen enclosure.

Finally, here is its photo:

VoCore2: Use more ethernet

Default VoCore2 only has one ethernet enabled, it is ethernet port0. But actually VoCore2 has 5 ethernet ports. This blog is talking about how to enable them.

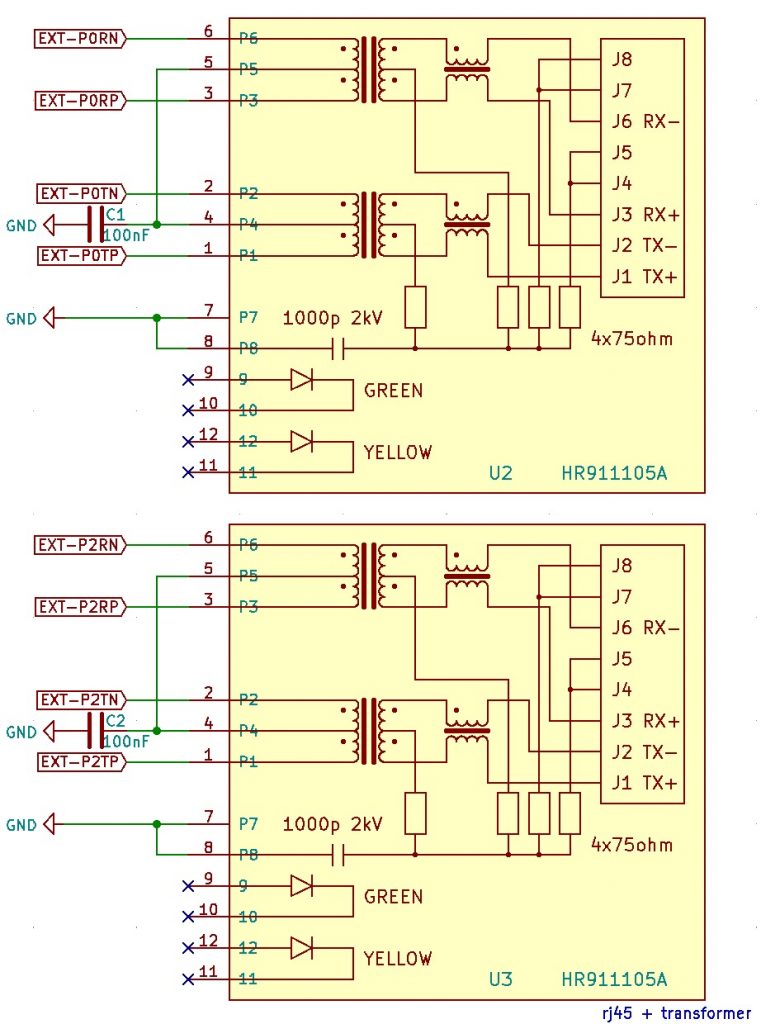
First, let’s check the hardware connection.

One RJ45 with transformer and one 100nF are enough to make one ethernet port work.

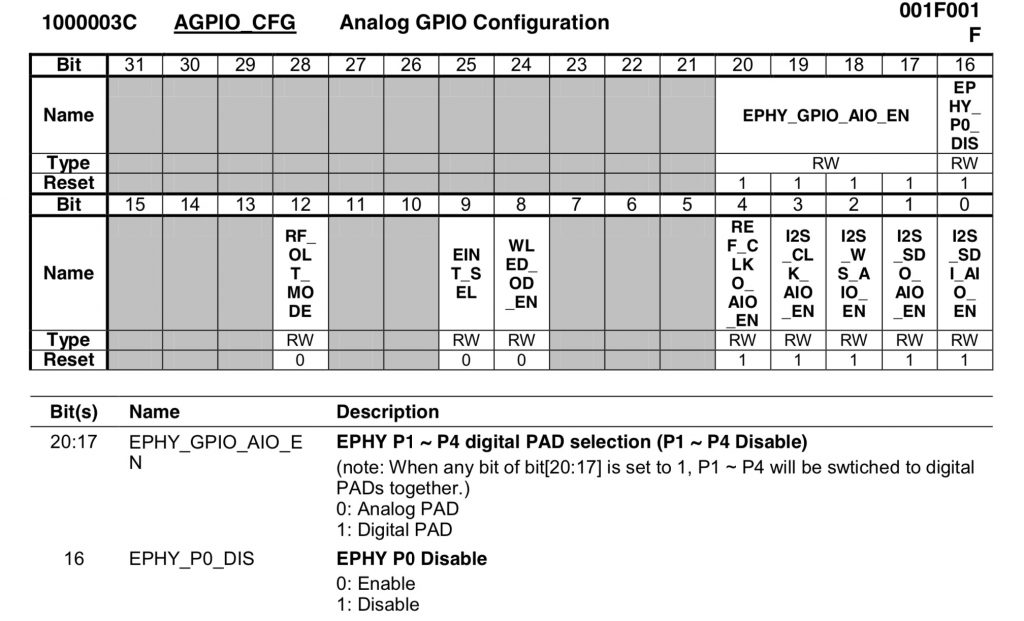
Second, we need to enable ports in kernel level.

This is controlled by register 0x1000003c. In client mode, we can simply use “mem 0x1000003c 0xe001ff” to setup it, or you can use hard way to enable this by device tree.

Once you finish second step, when you plug in or plug out the ethernet cable, you will find a kernel log like “rt3050-esw 10110000.esw: link changed 0x00”;

Port0 plug in: “rt3050-esw 10110000.esw: link changed 0x01”;

Both Port0 and Port2 plug in: “rt3050-esw 10110000.esw: link changed 0x05”

PS: once you enable more than one ethernet, debug port UART2 will be disabled, you will need to change it to UART0/UART1 in VOCORE2.dtsi/VOCORE2.dts; also SDMMC port for SD card is disabled either, please check blog http://vonger.cn/?p=14701 and http://vonger.cn/?p=14435 for tutorial about using 5 ethernet ports and SD card same time.

Third, we need to setup in OpenWrt to enable them

I am not very good at this part, looks like default OpenWrt setting is enabled that two ports, Port0 and Port2, but actually we only have one ethernet by default hardware(VoCore2 Ultimate). So if you only need to use two ports and the ports happens to be Port0 and Port2, you do not need change anything.

If you need to use other ethernet port like ethernet port1, port3, port4, you will need to setup /etc/config/network. Maybe also need to enable them in device tree. This part I am still learning, now I am trying different connection to understand virtual lan, later I will write another blog talk about my learning process. Any suggestions are warm welcome, please email to me(a)vonger.cn or support(a)vocore.io.

VoCore2: Force Write to Read-Only MTD Partition

When I make a test jig for a project, I need to write new uboot to cover old one. Normally I will use uboot UART to update uboot partition, that is the fastest way, we do not have to wait Linux system ready, but it has a failure rate because UART is not very stable.

Currently I need to login to Linux and run test application. I do not have to upload from UART anymore, but same time, I just found u-boot partition is default read-only. This is locked in VOCORE2.dts at compile stage to avoid user erase uboot by mistake. If we need to overwrite u-boot, we can not modify it directly but have to upgrade the firmware who has a writeable u-boot partition.

If I upgrade the firmware, it will take too much time, at least 2 minutes…not acceptable for mass production. For that reason, I am thinking, is that possible we hack the kernel and remove the READ-ONLY tag from mtd partition without do change to firmware?

Lucky, that is possible, and pretty simple to do.

mtd driver has a structure named mtd_info to store every detail of a mtd partition. It is using a flag named MTD_WRITEABLE to determine whether a mtd partition is readonly or not.

Reference: linux-4.14/drivers/mtd/ofpart.c

	if (of_get_property(pp, "read-only", &len))
		parts[i].mask_flags |= MTD_WRITEABLE;

Now, just need to find a way add that MTD_WRITEABLE flag to mtd partition.

We can not do it in user mode, because kernel mode memory is protected. So I write a small driver for it.

#include <linux/init.h>
#include <linux/module.h>
#include <linux/mtd/mtd.h>

int w2uboot_init(void)
{
    struct mtd_info *mtd;
    
    mtd = get_mtd_device_nm("u-boot");
    mtd->flags |= MTD_WRITEABLE;
    
    printk(KERN_INFO "unlock u-boot, now it is writeable\n");
    return 0;
}

void w2uboot_exit(void)
{
}

module_init(w2uboot_init);
module_exit(w2uboot_exit);

MODULE_LICENSE("GPL");
MODULE_AUTHOR("Qin Wei");

Compile and insert this module to kernel. Magically, the u-boot is unlocked. Now we can use mtd -e u-boot write uboot.bin u-boot write to uboot partition.

To compile the code(save as w2uboot.c), try this way in same folder:

echo 'obj-m=w2uboot.o' > Makefile
make -C [path to linux]/linux-4.14.195 M=$(PWD) CROSS_COMPILE=mipsel-openwrt-linux- ARCH=mips

VoCore2 + Bluetooth

Recently a lot of chip shortage, really makes me headache. ๐Ÿ™‚

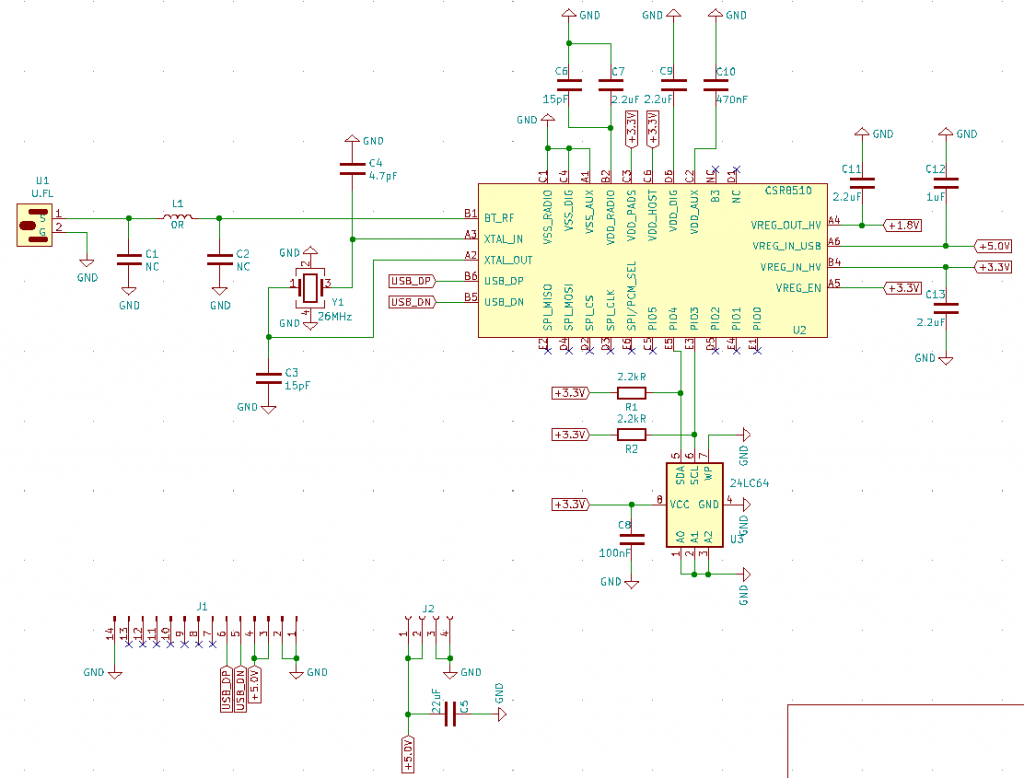
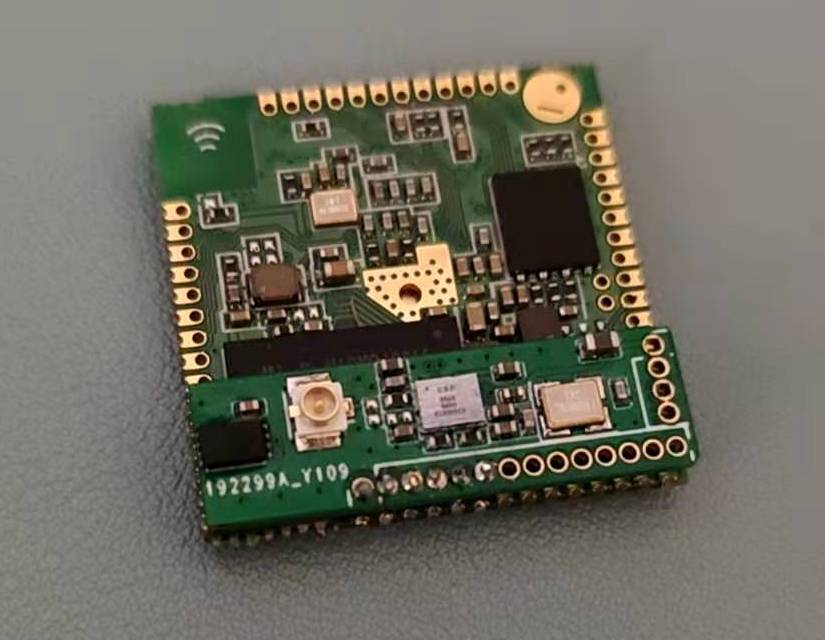
This is a bluetooth module works with VoCore2, it is based on CSR8510.

PS: Qualcomm is really a suck company. I can not get any documentation from them but have to find some leak ones online…

Lucky thing, this CSR8510 is almost working out of box. No idea what that EEPROM used to do, I just use an empty EEPROM, this device still work normally.

So connect it to VoCore2 USB host port, then remember install bluez-daemon in VoCore2, it just works.

We can use hciconfig / hciconfig hci0 to show this device.

And to make it work, call hciconfig hci0 up

Or scan nearby device by hcitool scan

Or ping the nearby device to make sure everything is normal: l2ping xx:xx:xx:C1:58:C2

Finally. here it is ๐Ÿ™‚

the little device ๐Ÿ™‚

MT76: Learningโ€ฆ3

Finally my patch has into main branch of mt76 ๐Ÿ™‚ now we have stable official supported wireless driver, and ADHOC, MESH are default supported too.

My patch link is here: https://github.com/openwrt/mt76/pull/426

Thanks the admin, make it in better format: https://github.com/openwrt/mt76/commit/97e65131440ccae916e76323251b80cafdfc9006

Next blog, I will try mesh and adhoc mode, check if they work.

Be Careful when Buy from lcsc.com

When I make samples, I prefer lcsc.com(or szlcsc.com) for a long time, but now, I can not recommend it anymore, because buy from them are pretty risky.

PS: for mass production, normally we directly order from parts factory, not such provider.

First Story

Around 2 years ago, 2017, I was working on POE version of VoCore2, I used a SMT electrolytic capacitor (22uF, 63V). From its datasheet, max allowed temperature is 260C 10seconds, but after my standard reflow(260C 6 seconds), 80% of that caps were become “popcorn”… lucky me, not exploded.

I contacted their sales and they sent me the replacement — even the total value was just 2USD but I spent over 5 hours to fix the samples — I was still happy.

Second Story

Just a few days ago, I bought some parts from them again. The BOM list was pretty long and I made a mistake, I chose wrong type of a SIM card slot because they really looks same…I found it out only when I received them. I contacted szlcsc.com in first time, hoped they can replace them, but guess what? They refused! Because they said they have rules that they refuse return parts even the package is not opened and not used at all.

That was a big surprise for me. And wrong parts are useless for me, it is a waste…

PS: its type is C99403, SIM-01A, 70pcs, if you want it, just contact me, I will send them to you free, just need postage ๐Ÿ™‚

I still negotiate with them. This is not fair, in any country of the world. We all make mistakes, if we can not return wrong package, who dare to buy from internet?

So finally, if you use lcsc.com too, just be very careful, because they do not allow return package even the package is not opened.

I am pretty unhappy with them this time, because there is no warning show on their site from begin to end. Even now, I still can not find such warning or rule on their site. Somebody told me that is really in their site somewhere but in a pretty small font…^_^?

Anyway, for such chip provider, just be careful and careful. You can not make any mistake when you put your order on them. I paid the school fee and now I know. ๐Ÿ™‚

VoCore2: OpenWrt 19.07.3 Firmware

Now official OpenWrt 19.07.3 firmware released.

Link: http://vonger.cn/misc/vocore2/20200811.19073.bin (For VoCore2)

Link: http://vonger.cn/misc/vocore2/20200812.19073.bin (For VoCore2 Ultimate)

Different is VoCore2 Ultimate has embed SD card driver, for VoCore2 do not have SD card slot, it will show a lot of junk message to the system log.

Embed software:

  • LuCI
  • mem (for /dev/mem access)

Support interface:

  • SD Card (V2U)
  • Ethernet
  • WiFi
  • I2C
  • I2S
  • GPIO
  • Reference Clock
  • SPI
  • USB 2.0 HS Host

MT76: Learningโ€ฆ2

After read the mt76 source code, I find the source code miss eerpom 0x34 setting (not a real eeprom, just flash factory partition), and 0x34 is used to choose antenna number…

So fix is pretty simple:

--- a/mt7603/init.c
+++ b/mt7603/init.c
@@ -277,6 +277,9 @@ mt7603_init_hardware(struct mt7603_dev *dev)
        if (ret < 0)
                return ret;
 
+       if (((u8*)dev->mphy.eeprom.data)[MT_EE_NIC_CONF_0] == 0x11)
+               dev->mphy.antenna_mask = 1;
+
        ret = mt7603_dma_init(dev);
        if (ret)
                return ret;

Once we find 0x34(MT_EE_NIC_CONF_0) is 0x11, force the driver use one antenna. That’s all.

Now after over 1 hour test, this mt76 driver is working very well and stably at >= 52Mbps 1T1R.