It has been three years, I still can not forget this project…It must be true love.


It has been three years, I still can not forget this project…It must be true love.
Currently USB screen are using two version of power supply chip, one is SY7200AABC, another is PT4103.
I thought they should be same function and work in same way…but I am wrong. PT4103 backlight is not as bright as SY7200AABC.
There is something wrong about PT4103…I set its current to 40mA, but the voltage on backlight is only 11.3V~11.5V, far from the required voltage 12.8V(3.2V x 4), but SY7200AABC works well, it is able to reach 12.5V.
First I think it is my design problem, maybe my resistors and inductors are wrong, but I tried modify the feedback resistor from 2ohm to 10ohm and change the inductor from 10uH~47uH, still no acceptable result. I find even I setup feedback resistor to 2ohm, the voltage is still lower than 11.5V.
I have no idea why PowTech’s PT4103 does not work, it should be a widely used chip but it is not as stable as SY7200AABC. Later version screen driver board I will use SY7200AABC.
Finally I get its documentation about XU registers, that means we can use its extend features now.
It supports OSD(the text on the picture, such as time or gps data), SEI(the data directly embed into the video stream, can be text or anything), motion detect (find bad guy), GPIO(not used) etc…
From my test, h264 at 25fps, 1080p, 14Mbps frame rate, power consume is 1.1w, not very low but much better than other h264 camera.
If for secure monitor or similar usage, at 5fps, 1080p is only 0.7watt.
PS: new demo and its source code example has upload to https://vocore.io/camera.html
1. Record 10 seconds(25fps, 250 frames) video stream into h264 file(RecordH264.h264).
note: Copy TestAP to /tmp or SD card folder, make sure the folder has at least 20MB free space.
./TestAP /dev/video1 –format H264 –size 1920×1080 –record –capture=250 –fr 25
2. Set H264 bitrate to 4Mbps.
./TestAP /dev/video1 –xuset-br 4000000
PS: its log will show XU_Multi_Get_Enable failed, ignore that, it should be something this camera do not support, once you find XU_H264_Set_BitRate <== Success, it is success.
This demo code is pretty bad but works…Later I will try to clean up the code and make a new demo.
This is just the first step…
PS: take by crap phone camera, not screen capture, sorry about the bad image quality.
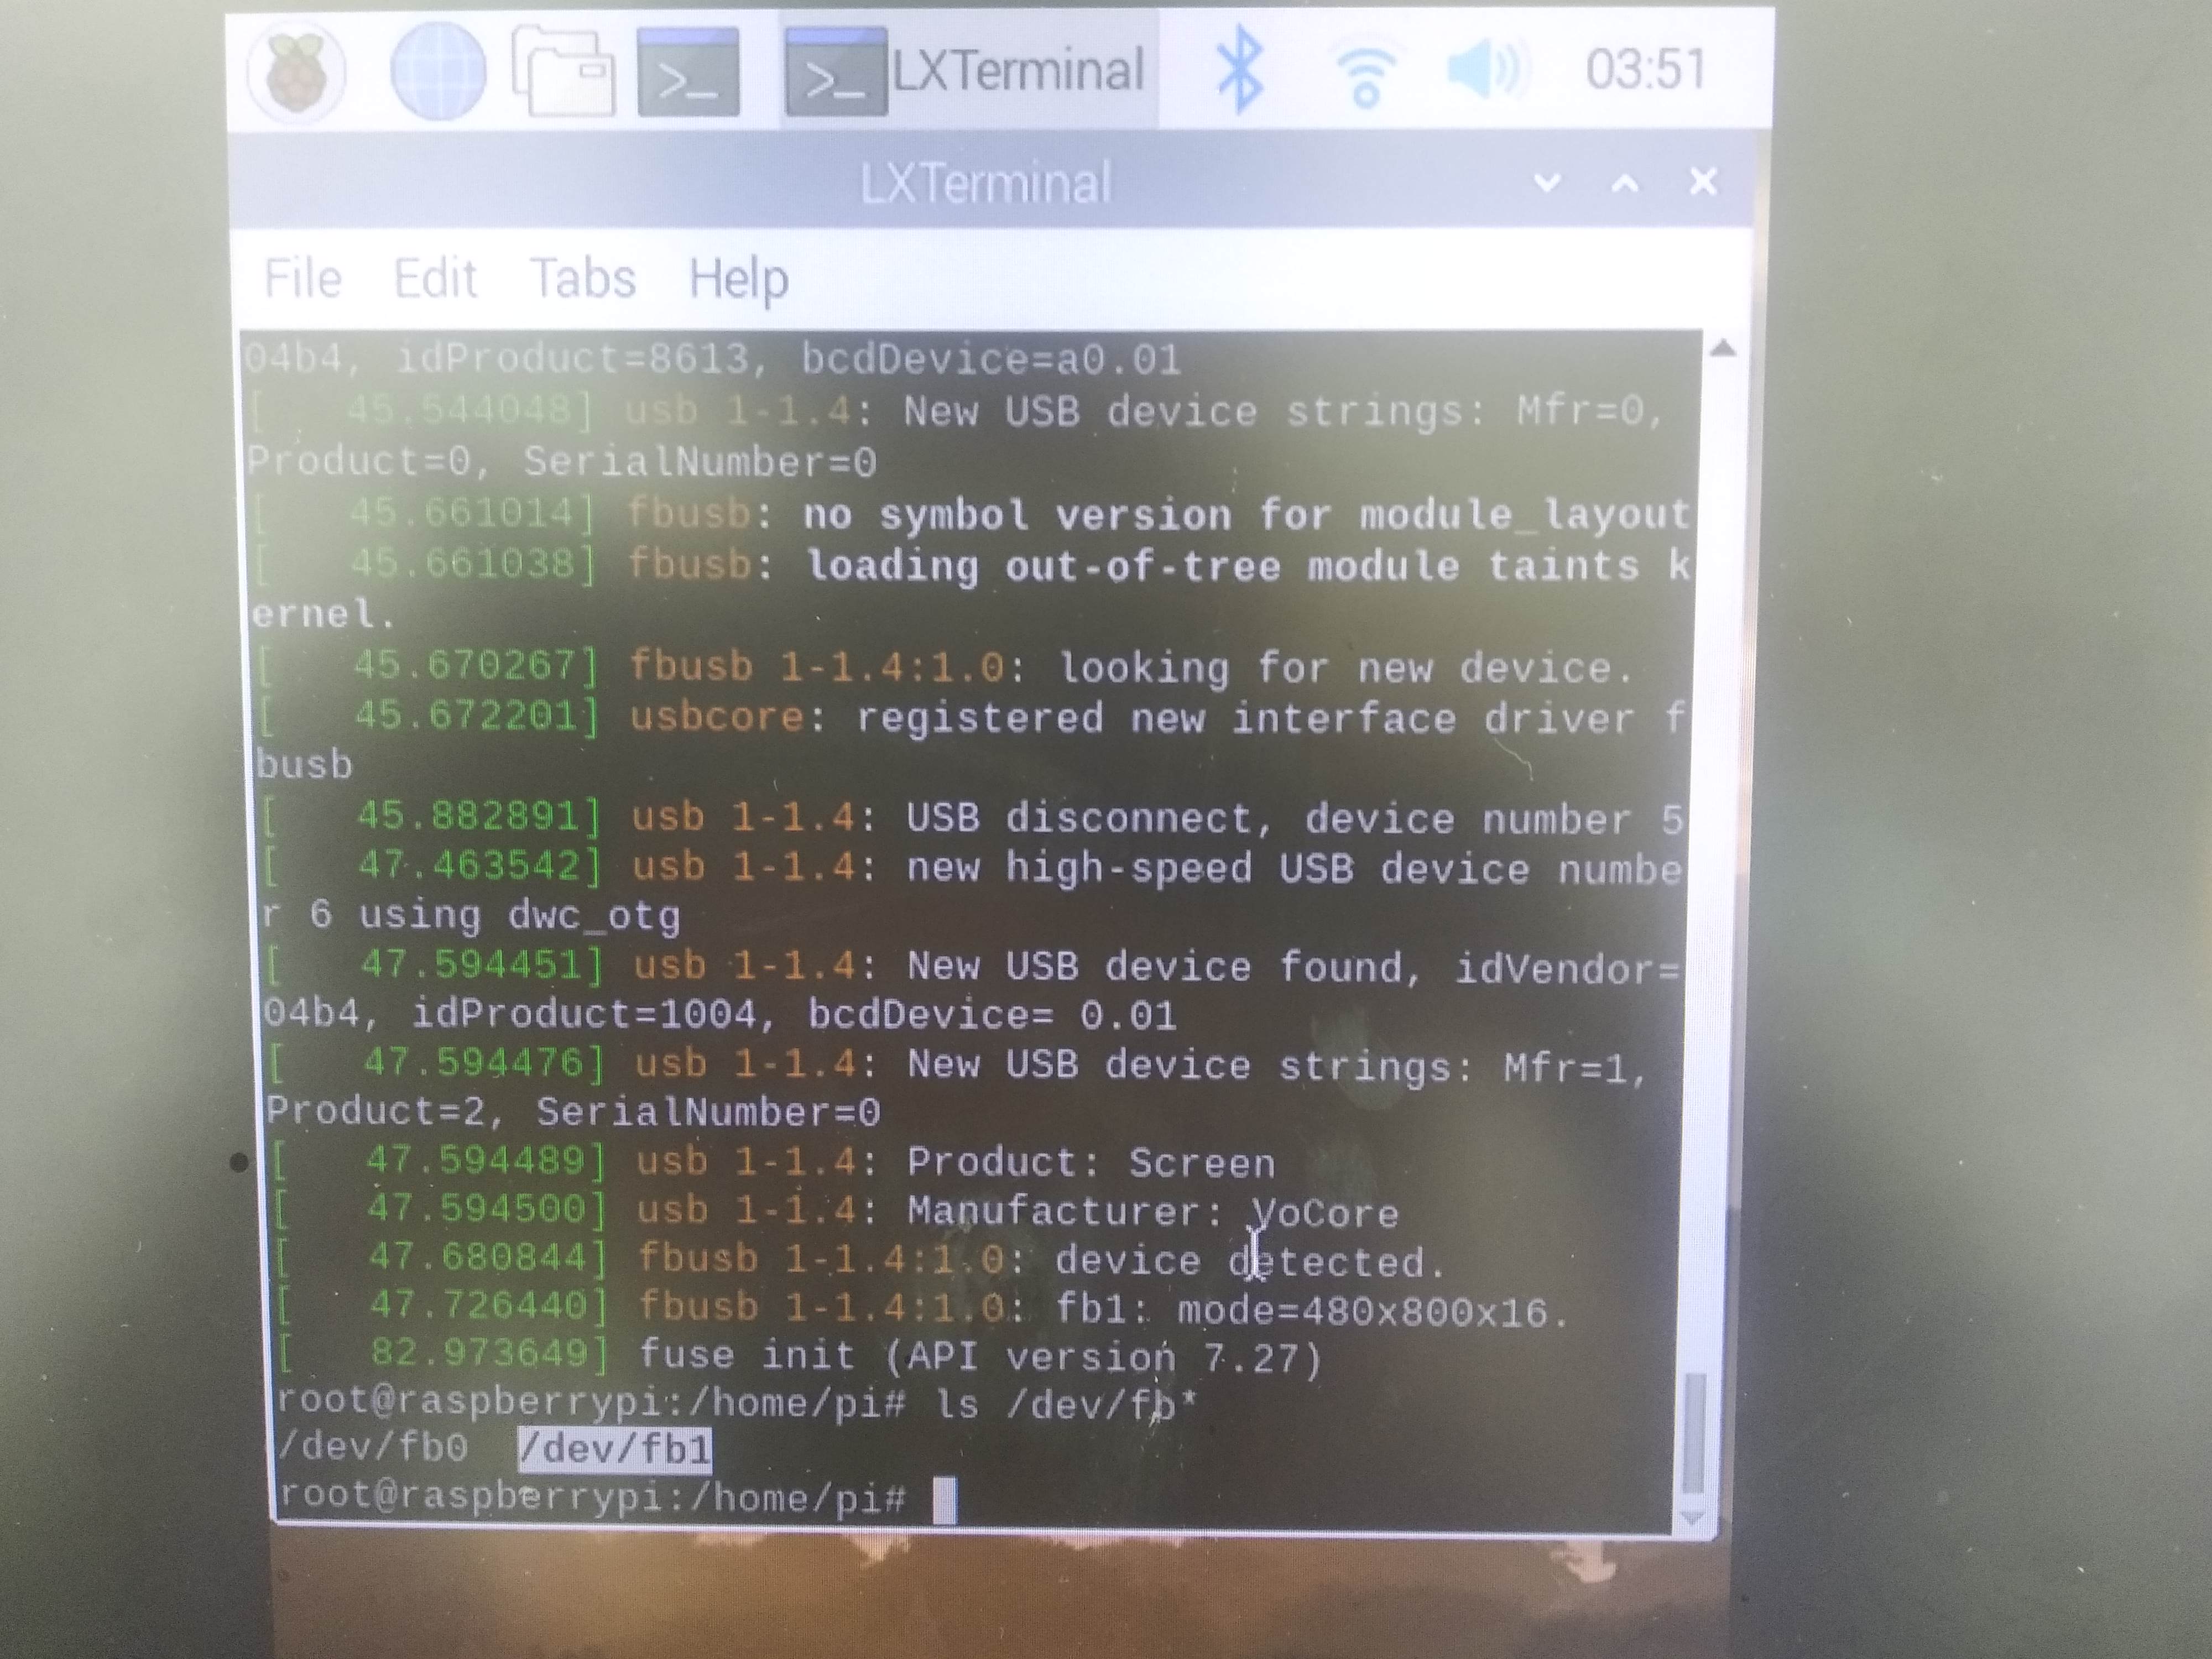
I find last time I can not insmod fbusb.ko to raspberry pi is because a stupid issue…raspberry pi already have a module named usbtest.ko, it is using same USB VID/PID. Ye, I can not afford that USB ID cost so I just use the chip CY7C680 default VID/PID, that cause the conflict and kernel taint… 🙂
Now it works…just replace the usbtest.ko in /lib/modules/4.19.50*/kernel/drivers/usb/misc/usbtest.ko with fbusb.xxxx.ko, in /lib/modules there are three usbtest.ko, not sure why there are so many of them…for simple, replace them all 🙂
Then reboot, you will find /dev/fb1, and write 16bit bmp to it, display normal.
It’s done. :p
PS: sudo FRAMEBUFFER=/dev/fb1 startx do not work..need deep dig into it.
Today I make some progress on i2c, because I want to use VoCore2 to driver a IR camera, its type is MLX90640, but i2c-gpio spends too much CPU and old hardware driver i2c-mt7621 can not get correct data.
i2c-gpio spends a lot of CPU time because it is using busy wait between every bit, so if I want to get MLX90640 at 8fps, it will need 800byte x 8bit x 8 = 51.2KHz, emm, currently i2c-gpio max speed is 250KHz, so it will take over 20% CPU…not a good choice.
i2c-mt7621 driver is using auto mode of mt7628’s i2c hardware, but that ‘auto’ mode only allow send byte one by one. (PS: what stupid auto mode…not auto at all…maybe something wrong?), it is much faster and less cpu taken than i2c-gpio mode, but between two bytes it has a big gap, around 50us, it is not acceptable by MLX90640, so if using this driver, I will never get 90640 correct data.
I have to find some new way… When I look into datasheet, I find mt7628 i2c also support a “sequence” mode which is able to send up to 8 bytes one time, and also get every byte status bit (status bit is NACK, ACK), this is perfect.
After several tries, I make it work successfully.
Here is the core part of code, raw patch uploaded to github.com/vonger/vocore2.git, replace old 0045 patch in openwrt.
static int mtk_i2c_trigger(struct mtk_i2c *i2c, u32 mode, u32 c)
{
	u32 val, reg = 0;

	val = (mode << SM0_MODE_SHIFT) | ((c - 1) << PGLEN_SHIFT) | SM0_TRI_BUSY;
	iowrite32(val, i2c->base + REG_SM0CTL1);

	usleep_range(i2c->delay * c, i2c->delay * c + 50);
	if (mode == SM0_MODE_WRITE || mode == SM0_MODE_READ_ACK) {
		reg = ioread32(i2c->base + REG_SM0CTL1);
		val = (reg >> ACK_SHIFT) & ACK_MASK;
		if (val == 0)
			return -1;
	}
	return 0;
}

static int mtk_i2c_master_read(struct mtk_i2c *i2c, struct i2c_msg *cur)
{
	int used = 0;

	iowrite32(cur->addr * 2 + 1, i2c->base + REG_SM0D0);
	if (mtk_i2c_trigger(i2c, SM0_MODE_WRITE, 1) < 0)
		return -1;

	while (used < cur->len) {
		int size = min(cur->len - used, 8);

		if (used + size == cur->len)	/* last page, send NAK */
			mtk_i2c_trigger(i2c, SM0_MODE_READ_NACK, size);
		else
			mtk_i2c_trigger(i2c, SM0_MODE_READ_ACK, size);

		memcpy(cur->buf + used, i2c->base + REG_SM0D0, size);
		used += size;
	}
	return used;
}

static int mtk_i2c_master_write(struct mtk_i2c *i2c, struct i2c_msg *cur)
{
	int used = 0;

	iowrite32(cur->addr * 2, i2c->base + REG_SM0D0);
	if (mtk_i2c_trigger(i2c, SM0_MODE_WRITE, 1) < 0)
		return -1;

	while (used < cur->len) {
		int size = min(cur->len - used, 8);
		memcpy(i2c->base + REG_SM0D0, cur->buf + used, size);
		mtk_i2c_trigger(i2c, SM0_MODE_WRITE, size);
		used += size;
	}
	return used;
}

static int mtk_i2c_master_xfer(struct i2c_adapter *a, struct i2c_msg *m, int c)
{
	struct mtk_i2c *i2c = i2c_get_adapdata(a);
	int i;

	for (i = 0; i < c; i++) {
		if (m[i].flags & I2C_M_TEN)
			return -EINVAL;
		mtk_i2c_trigger(i2c, SM0_MODE_START, 1);
		if ((m + i)->flags & I2C_M_RD) {
			if (mtk_i2c_master_read(i2c, m + i) < 0)
				break;
		} else {
			if (mtk_i2c_master_write(i2c, m + i) < 0)
				break;
		}
	}
	mtk_i2c_trigger(i2c, SM0_MODE_STOP, 1);

	/* can not access one or more address in the i2c_msg */
	if (i != c)
		return -ENODEV;

	/* the return value is number of executed messages */
	return i;
}
Finally it is hardware driver now, I have set i2c bus to 400KHz in VOCORE2.dts, do not waste it 🙂 Also this driver fixed i2c-mt7621 can not detect device by i2cdetect, now i2cdetect -r/-q both works well.