Monthly Archives: March 2020

VoCore2 Ultimate: AD/DA usage 2

Forget Keil, I love GCC. Makefile is enough for the ARM based chip GD32F150 🙂

Link to my source code:https://github.com/Vonger/gd32tools

To get AD values from UART2. Here is the Makefile. Source code please use project/adc1.

NAME = $(notdir $(CURDIR))
CMSIS = $(CURDIR)/../../GD32F1x0_Firmware_Library_v3.1.0/Firmware/CMSIS
PERIP = $(CURDIR)/../../GD32F1x0_Firmware_Library_v3.1.0/Firmware/GD32F1x0_standard_peripheral
TOOLCHAIN = $(CURDIR)/../../toolchain/mac/bin/arm-none-eabi

CC = $(TOOLCHAIN)-gcc
CP = $(TOOLCHAIN)-objcopy

DEFINES = -DGD32F130_150 -DUSE_STDPERIPH_DRIVER -DUSE_HSI_8M

INCLUDES = \
	-I$(CURDIR)/../core \
	-I$(CMSIS)/GD/GD32F1x0/Include \
	-I$(PERIP)/Include \
	-I$(CURDIR)

SOURCES = \
	$(CURDIR)/../core/core_cm3.c \
	$(CURDIR)/../core/startup_gd32f1x0.s \
	$(CMSIS)/GD/GD32F1x0/Source/system_gd32f1x0.c \
	$(wildcard $(PERIP)/Source/*.c) \
	$(wildcard $(CURDIR)/*.c)

OBJECTS = $(SOURCES:%.c=%.o)

CFLAGS = \
	-mcpu=cortex-m3 -mthumb -mlittle-endian -mthumb-interwork \
	-ffast-math -fdata-sections -ffunction-sections \
	-Wl,-T,$(CURDIR)/../core/gd32f150g8.ld,-Map,$(NAME).map,--gc-sections \
	-Wall -std=gnu99 -O2 $(DEFINES) $(INCLUDES) 

$(NAME): $(SOURCES)
	@$(CC) $(CFLAGS) $^ -lm -lnosys -o $(CURDIR)/$@
	@$(CP) -O ihex $(CURDIR)/$@ $(CURDIR)/$@.hex

test:
	@echo $(OBJECTS)

clean:
	@rm -f $(CURDIR)/$(NAME)
	@rm -f $(CURDIR)/$(NAME).map

GD32F1x0_Firmware_Library_v3.1.0 this library is from GigaDevice. Download here: http://vonger.cn/misc/vocore2/GD32F1x0_Firmware_Library_v3.1.0.rar; For toolchain, please check http://vonger.cn/?p=14891, I have a link there.

The library is for Keil originally. I make some patches, all changes are in project/core folder.

  • startup_gd32f1x0.s this mainly change the interrupt vector, we need the interrupt callback function name same.
  • gd32f150g8.ld this is used to create bin or hex file which is used to load into flash.

For VoCore2 Ultimate, we use internal 8M clock, so comment the line 46 #define __SYSTEM_CLOCK_72M_PLL_HXTAL and uncomment line 47 #define __SYSTEM_CLOCK_72M_PLL_IRC8M_DIV2 in GD32F1x0_Firmware_Library_v3.1.0/Firmware/CMSIS/GD/GD32F1x0/Source/system_gd32f1x0.c

Now we are ready to make. in adc1 folder, call make, it will create adc1.hex.

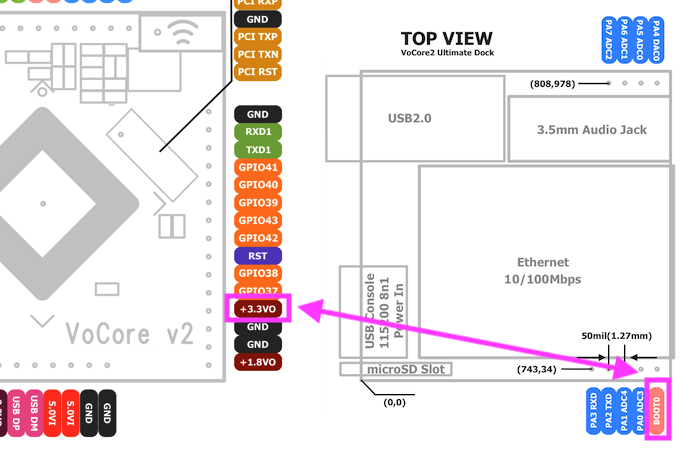
Connect BOOT pin on the dock to 3.3V pin on VoCore2, then power on them from microUSB.

Once VoCore2 ready, run gd32up to load adc1.hex. After upload done, power off it and disconnect BOOT from 3.3V (We do not export its RST pin, so have to power off to reset).

After you connect it back to power, the GD32F150 will in ADC mode, UART2 on VoCore2 is not for USB2TTL anymore, it will output ADC value to VoCore’s UART2. We can use minicom to view it at VoCore2 console, 115200, 8n1.

VoCore2: run GCC in it

This is a tutorial for using C/C++ compile application in VoCore2.

1. Prepare a USB disk or SD card, at least 256MB, because GCC takes around 110MB. USB disk or SD card must be EXT4 format.

For macOS or Linux, call mkfs.ext4 /dev/disk2 to do this. /dev/disk2 is the USB disk name on my computer, please change to the name on your computer. Or another way, directly format it in VoCore2, need to install e2fsprogs.

opkg update
opkg install e2fsprogs
mkfs.ext4 /dev/sda

NOTE: opkg updaterequires internet, check vocore.io/v2.html, AP+Client mode for wireless connection. Or modify network switch settings, set ethernet port0 to VLAN 2(wan).

This is an example, directly patch /etc/config/network. Another way, you can change virtual network switch in LuCI, Network->Switch.

 config switch_vlan     
         option device 'switch0'
-        option vlan '1'  
+        option vlan '2'    
         option ports '0 6t'

2. Mount SD/USB storage to /overlay

Patch /etc/config/fstab, add target /overlay to make sure once storage is detected, system will auto mount it to /overlay.

config 'global'
        option  anon_swap       '0'
        option  anon_mount      '0'
        option  auto_swap       '1'
        option  auto_mount      '1'
        option  delay_root      '5'
        option  check_fs        '0'

config 'mount'
        option  device  '/dev/sda'
        option  target  '/overlay'
        option  enabled '1'

config 'mount'
        option  device  '/dev/mmcblk0'
        option  target  '/overlay'
        option  enabled '1'

/dev/sda is for USB disk, /dev/mmcblk0 is for SD card.

3. Reboot

Make sure /overlay is valid. You can check by command df.

root@OpenWrt:~# df
Filesystem           1K-blocks      Used Available Use% Mounted on
/dev/root                12800     12800         0 100% /rom
tmpfs                    62492       660     61832   1% /tmp
/dev/mmcblk0          30363504    148636  28649428   1% /overlay
overlayfs:/overlay    30363504    148636  28649428   1% /
tmpfs                      512         0       512   0% /dev

Or another way, directly manually mount /dev/sda or /dev/mmcblk0 to /overlay folder by command mount /dev/sda /overlay.

4. Now we can install GCC

This part is easy, just call

opkg update
opkg install gcc

It will install gcc, ar, binutils,libbfd, objdump, libopcodes packages from openwrt server.

Then we can compile C source code, try gcc yourcode.c -o out. Speed is not very fast, but works.

NOTE: compile better in /tmp folder(it is memory virtual disk) or in /overlay(it is the SD card we inserted). Rest path will store in NOR flash who has very limited write times and very little free space.