Monthly Archives: January 2020

VoCore2: develop SPI driver 6

Recently Wuhan Virus is pretty bad in China, hopefully everything back well soon.

Now I have success use GPIO as CS pins, it is not hard but have to cost a lot of time understanding how the SPI driver works 🙂

Here is the patch for spi-mt7621.c, also upload to github.com/vonger/vocore2, 811-spi-gpio-chip-select.patch

 --- a/drivers/spi/spi-mt7621.c
+++ b/drivers/spi/spi-mt7621.c
@@ -107,9 +107,15 @@
  u32 polar = 0;
 
     mt7621_spi_reset(rs, cs);
+
+ if (cs >= 2) { /* gpio chip select mode */
+ enable = (spi->mode & SPI_CS_HIGH) ? enable : !enable;
+ gpio_set_value_cansleep(spi->cs_gpio, enable);
+ } else {
  if (enable)
  polar = BIT(cs);
  mt7621_spi_write(rs, MT7621_SPI_POLAR, polar);
+ }
 }
 
 static int mt7621_spi_prepare(struct spi_device *spi, unsigned int speed)
@@ -383,9 +389,17 @@
  return -EINVAL;
  }
 
+ if (spi->chip_select >= 2 && gpio_is_valid(spi->cs_gpio))
+ gpio_request_one(spi->cs_gpio, GPIOF_OUT_INIT_HIGH, dev_name(&spi->dev));
+
  return 0;
 }
 
+static void mt7621_spi_cleanup(struct spi_device *spi)
+{
+ gpio_free(spi->cs_gpio);
+}
+
 static const struct of_device_id mt7621_spi_match[] = {
  { .compatible = "ralink,mt7621-spi" },
  {},
@@ -438,10 +452,11 @@
  master->mode_bits = RT2880_SPI_MODE_BITS;
 
  master->setup = mt7621_spi_setup;
+ master->cleanup = mt7621_spi_cleanup;
  master->transfer_one_message = mt7621_spi_transfer_one_message;
  master->bits_per_word_mask = SPI_BPW_MASK(8);
  master->dev.of_node = pdev->dev.of_node;
- master->num_chipselect = 2;
+ master->num_chipselect = of_gpio_named_count(pdev->dev.of_node, "cs-gpios");
  master->max_transfer_size = mt7621_max_transfer_size;
 
  dev_set_drvdata(&pdev->dev, master);

Here is the patch explain:

  1. For chip select number is 0,1, we use old driver way, SPI hardware register will control the CS0 and CS1
  2. For the chip select we added, CS2, CS3, etc, we use GPIO way, so we call gpio_set_value_cansleep, use GPIO way to control them.
  3. In order to use those GPIO, we need to call gpio_request to alloc GPIO from the kernel, once it is done, we use gpio_free to release resource.
  4. SPI master max SPI device now is not 2, it is the GPIO CS pins we defined in DTS(device tree file)

After this patch, we have the SPI new driver ready, but still need to setup DTS to tell the driver which GPIO we want to use as CS pins.


&spi0 {
status = "okay";

cs-gpios = <&gpio0 6 GPIO_ACTIVE_HIGH>,
  <&gpio0 10 GPIO_ACTIVE_HIGH>,
  <&gpio1 5 GPIO_ACTIVE_HIGH>,
  <&gpio1 6 GPIO_ACTIVE_HIGH>;


m25p80@0 {
...
};

spidev1@1 {
#address-cells = <1>;
#size-cells = <1>;
compatible = "rohm,dh2228fv";
reg = <1>;
spi-max-frequency = <100000000>;
};

spidev2@2 {
#address-cells = <1>;
        #size-cells = <1>;
        compatible = "rohm,dh2228fv";
        reg = <2>;
        spi-max-frequency = <100000000>;
};

spidev3@3 {
        #address-cells = <1>;
        #size-cells = <1>;
        compatible = "rohm,dh2228fv";
        reg = <3>;
        spi-max-frequency = <100000000>;
    };
};


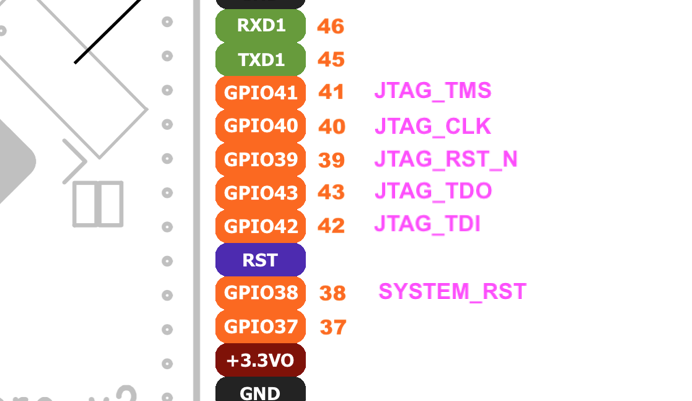
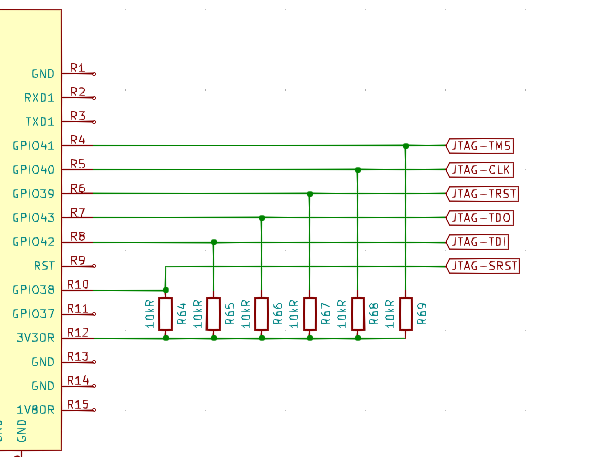
<GPIO0 5> <GPIO0 10> is not really used as GPIO, just a place holder for CS0, CS1. <GPIO1 5> is CS2, it is GPIO37(32+5), <GPIO1 6> is CS3, it is GPIO38(32+6). Once we have this, we can connect SPI device CS pins to it, I use spidev_test check if it is working.

Note: spi-mt7621 max allowed data length is 16byte, so do not send data exceeds this number, or it will oops. Use ‘-p’ parameter to avoid spidev_test default send 38 bytes.

My test result:

root@OpenWrt:/# spidev_test -D /dev/spidev0.3 -p '\x020'
spi mode: 0x0
bits per word: 8
max speed: 500000 Hz (500 KHz)
RX | 00 1A __ __ __ __ __ __ __ __ __ __ __ __ __ __ __ __ __ __ __ __ __ __ __ __ __ __ __ __ __ __  | ..

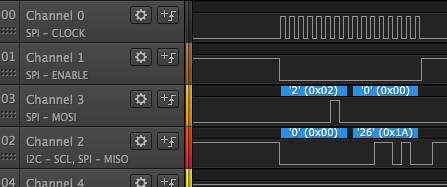
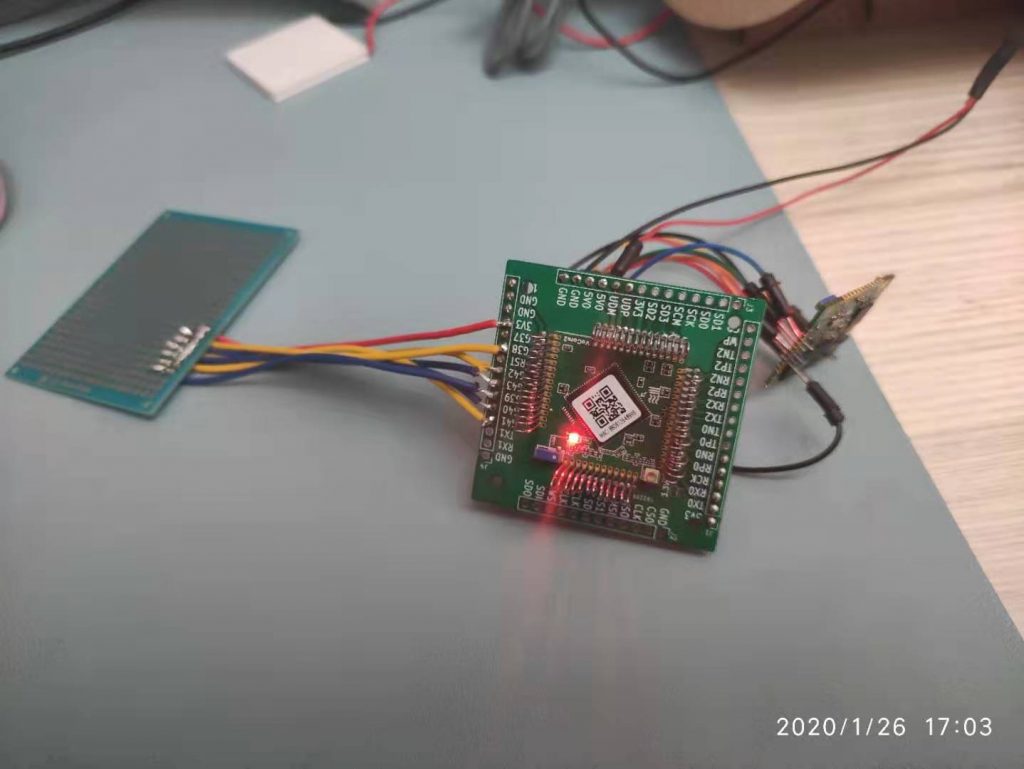
I connected one LoRA device SX1278, and using spidev0.3, in DTS it is spidev3@3, I can successfully read its 0x02 register and get its data is 0x1A.

Here is the same data I read from logic analyzer.

VoCore2: Use VoCore2 & OpenOCD to debug VoCore2 by JTAG

This blog will include two parts, first, make one VoCore2(name it host) into a JTAG compatible device, like JLINK; second, enable another one VoCore2(name it client) JTAG port, so we can use host JTAG connect to it and debug.

my simple crappy JTAG device :’) middle one is the host with a breakout board, right small one is the client device, left one is some 10kR resistors pull up every JTAG pins to 3.3V

OK, let’s start how to make it.

JTAG Host Device

  1. OpenOCD only requires some GPIOs to make the JTAG work in TAP mode, so let’s define some GPIOs as JTAG pins.
TMS = GPIO41, TCLK = GPIO40, JRST = GPIO39, TDO = GPIO43, TDI = GPIO42, SRST = GPIO38

JTAG has five pins, TMS, TCLK, JRST, TDO, TDI. SRST is for system reset, openOCD will use this pin to reset client VoCore.

2. Add pull up resistor to all of the JTAG pins.

3. Now install openocd to VoCore2. I have uploaded openocd package Makefile to github.com/vonger/vocore2, in utils/openocd folder, or you can directly use the openocd Makefile in openwrt official feeds named “package”.

It will require some depends: hidapi_0.8.0-rc1-2_mipsel_24kc.ipk, libftdi1_1.4-6_mipsel_24kc.ipk, libusb-1.0_1.0.22-1_mipsel_24kc.ipk, libusb-compat_0.1.5-1_mipsel_24kc.ipk

Note: actually we do not need hidapi, libusb, but install it is the most easy way, so we do not have to modify its Makefile.

4. Download openOCD configure file for VoCore2. I am using configure from https://github.com/Neutree/MT7688-OpenOCD, jlink-gpio.cfg. Because my GPIO setting is different, so need to modify its pin define.

# tck tms tdi tdo
sysfsgpio_jtag_nums 40 41 42 43
sysfsgpio_srst_num 39
sysfsgpio_trst_num 38

bindto 0.0.0.0

Note: For OpenWrt 21.02, gpio start from 416, not 0. It is weird but true, we need to use gpio 456(416+40) to export gpio 40. It should be sysfsgpio_jtag_nums 456 457 458 459.

Now, this host JTAG VoCore2 prepare is done. Actually it is ready to debug any JTAG compatible device, just need different cfg files.

If you want to access it from remote, must add bindto command, or openocd will bind to localhost only, can not access from outside. Sad, I spend two hours to solve this problem, I thought it was firewall issue. 🙁

JTAG Client Device

  1. We need to change default bootstrap from GPIO to JTAG. One way is directly modify register 0x10000010 SYSCFG0, but it will back to GPIO mode once you reboot. Another way is to modify bootstrap resistor, we have to use this way.
change default R9 resistor to R6 position, that will enable JTAG mode on client device

2. connect host JTAG cables to it. All of the six cables are necessary.

client connection, do not forget connect host/client GND together

3. connect client VoCore2 and host VoCore2 GND together, to avoid data transfer issue.

Ready to RUN!

Now we have prepared the JTAG host device and a test client device. We can power them on with 5V.

In host VoCore2, run command: openocd -f jlink-gpio.cfg &, it will create a server process, in jlink-gpio.cfg, we define telnet port is 4444 and gdb port is 3333, then we can use telnet connect to VoCore2 4444 port(remember to open the port at firewall).

Here is my log:


root@OpenWrt:~# openocd -f jlink_gpio.cfg
Open On-Chip Debugger 0.10.0
Licensed under GNU GPL v2
For bug reports, read
http://openocd.org/doc/doxygen/bugs.html
SysfsGPIO nums: tck = 40, tms = 41, tdi = 42, tdo = 43
SysfsGPIO num: srst = 39
SysfsGPIO num: trst = 38
adapter_nsrst_delay: 100
Info : auto-selecting first available session transport "jtag". To override use 'transport select <transport>'.
jtag_ntrst_delay: 100
trst_and_srst separate srst_gates_jtag trst_push_pull srst_open_drain connect_deassert_srst
0
Info : SysfsGPIO JTAG/SWD bitbang driver
Info : JTAG only mode enabled (specify swclk and swdio gpio to add SWD mode)
Info : This adapter doesn't support configurable speed
Info : JTAG tap: mt7688.cpu tap/device found: 0x1762824f (mfg: 0x127 (MIPS Technologies), part: 0x7628, ver: 0x1)

And telnet side (I am new to openOCD, I guess this log means it already works somehow)

 
Vongers-MacBook-Pro-2:~ vonger$ nc 192.168.61.1 4444
Info : accepting 'telnet' connection on tcp/4444
Open On-Chip Debugger
> ddrinit
ddrinit
Warn : target not halted
target not halted
Error: mem2array: Read @ 0xb0000028, w=4, cnt=1, failed
mem2array: Read @ 0xb0000028, w=4, cnt=1, failed
jlink_gpio.cfg:50: Error: 
in procedure 'ddrinit' 
at file "jlink_gpio.cfg", line 50
jlink_gpio.cfg:50: Error: 
in procedure 'ddrinit' 
at file "jlink_gpio.cfg", line 50
> halt
halt
target halted in MIPS32 mode due to debug-request, pc: 0x8000b1a8
> reg
===== mips32 registers
(0) r0 (/32): 0x00000000
(1) r1 (/32): 0x00000001
(2) r2 (/32): 0x81000040
(3) r3 (/32): 0x804E5220
(4) r4 (/32): 0x810BC180
(5) r5 (/32): 0x00000000
(6) r6 (/32): 0x00100000
(7) r7 (/32): 0x00000001
(8) r8 (/32): 0x10000000
(9) r9 (/32): 0x10000000
(10) r10 (/32): 0x00000000
(11) r11 (/32): 0x706C6174
(12) r12 (/32): 0x08000000
(13) r13 (/32): 0x00000003
(14) r14 (/32): 0x00000000
(15) r15 (/32): 0xFF200000
(16) r16 (/32): 0x804A9A90
(17) r17 (/32): 0x00008000
(18) r18 (/32): 0x00000001
(19) r19 (/32): 0x00100000
(20) r20 (/32): 0x81000040
(21) r21 (/32): 0xFFFFFFFF
(22) r22 (/32): 0x00001001
(23) r23 (/32): 0x00000000
(24) r24 (/32): 0x00000003
(25) r25 (/32): 0x00000002
(26) r26 (/32): 0x87FF0000
(27) r27 (/32): 0x00000000
(28) r28 (/32): 0x80458000
(29) r29 (/32): 0x80459CD0
(30) r30 (/32): 0x0000001F
(31) r31 (/32): 0x80491CE4
(32) status (/32): 0x10000000
(33) lo (/32): 0x00000088
(34) hi (/32): 0x00000000
(35) badvaddr (/32): 0x77E8BA18
(36) cause (/32): 0x40008008
(37) pc (/32): 0xFF200208
(38) f0 (/32): 0x00000000
(39) f1 (/32): 0x00000000
(40) f2 (/32): 0x00000000
(41) f3 (/32): 0x00000000
(42) f4 (/32): 0x00000000
(43) f5 (/32): 0x00000000
(44) f6 (/32): 0x00000000
(45) f7 (/32): 0x00000000
(46) f8 (/32): 0x00000000
(47) f9 (/32): 0x00000000
(48) f10 (/32): 0x00000000
(49) f11 (/32): 0x00000000
(50) f12 (/32): 0x00000000
(51) f13 (/32): 0x00000000
(52) f14 (/32): 0x00000000
(53) f15 (/32): 0x00000000
(54) f16 (/32): 0x00000000
(55) f17 (/32): 0x00000000
(56) f18 (/32): 0x00000000
(57) f19 (/32): 0x00000000
(58) f20 (/32): 0x00000000
(59) f21 (/32): 0x00000000
(60) f22 (/32): 0x00000000
(61) f23 (/32): 0x00000000
(62) f24 (/32): 0x00000000
(63) f25 (/32): 0x00000000
(64) f26 (/32): 0x00000000
(65) f27 (/32): 0x00000000
(66) f28 (/32): 0x00000000
(67) f29 (/32): 0x00000000
(68) f30 (/32): 0x00000000
(69) f31 (/32): 0x00000000
(70) fcsr (/32): 0x00000000
(71) fir (/32): 0x00000000

VoCore2 Ultimate: AD/DA usage

On VoCore2 Ultimate dock, we have a chip GD32F150G8U6 which is used as USB2TTL chip, so we can login to VoCore2 console through USB.

But GD32F150G8U6 has much more function than just USB2TTL, it has AD/DA convert inside. We can disable USB2TTL and switch it to AD/DA function. VoCore2 UART2 can be used to get AD/DA data from GD32F150.

This is current dock GD32F150 part of sch, PA0-PA7 and BOOT are exported; TXD/RXD are connected to VoCore2; USB DM/DP are connected to microUSB on dock.

In order to make AD/DA work, need to write a small firmware for GD32F150. we have toolchain already, use ARM-M3 default toolchain, link is here: https://developer.arm.com/tools-and-software/open-source-software/developer-tools/gnu-toolchain/gnu-rm/downloads

Also we need some library to help us use the chip. GD32F150 library I upload to the blog server, can download here: http://vonger.cn/misc/vocore2/GD32F1x0_Firmware_Library_v3.1.0.rar

Once compiled finish, we can use gd32up to load it to chip(do not forget to set the BOOT pin to high-5V when flash firmware), source code at github.com/vonger/gd32tools, this one can be compiled by VoCore2 toolchain gcc and run in VoCore2 directly.

Here are some examples source code about GD32F150: http://vonger.cn/misc/vocore2/GD32150G8U6.HSI.zip

VoCore2 Ultimate is using example 22_USB_VirtualComPort, I modified its USB pull up pin in usb_hwp.c to GPIOA,GPIO_PIN_13 to fit the hardware.

To be continue… later I will try to write a demo code about AD/DA firmware.If you want to try it first, check example 18_ADC_conversion_triggered_by_timer and 19_DAC_Digital_To_Analog_Conversion