Monthly Archives: April 2019

VoCore2: Weird Issue of Audio

Just fixed that audio record issue last week, but a new issue comes.

If we play wav before record wav, everything works; if we directly record audio, it will not work, and even worse, it will crash the kernel, cause system reboot.

First, I think it is DMA issue, but when I remove my last patch which set audio chip register 0x2B to 0x80, I can record(but data in file is not correct) and system won’t reboot. So it should not DMA issue.

Second, maybe LRCLK or MCLK or BCLK? Now I am using slave mode(master mode clock do not support FS=272, if we record in 272 it will have noise). It might be such issue, have to do more test and monitor I2S pins.

VoCore2: new firmware 20190422

Now new firmware is ready at http://vonger.cn/misc/vocore2/20190422.bin

new firmware is ready at http://vonger.cn/misc/vocore2/20190422.bin
 
New features for VoCore2 and its screen
 
– add ext4 driver to firmware.
– add librt to firmware.
– default support Qt/GDB debug.
– add framebuffer driver and fbcon for console to firmware.
– add dosbox/libsdl makefile to vocore2 github.
– new vocore2 banner in firmware.
– add vocore2 screen driver support to screen sdk.
– add keyboard support to DOOM demo in screen sdk.
 
Bug Fix:
 
– fix audio record issue in 44.1kHz.
– fix feeds source duplicated.
– fix some spell mistake on github.

VoCore2: Extend Storage and Memory

This tutorial need preinstall kmod-fs-ext4.

Extend Storage

Openwrt is using overlay file system, so we can directly attach sd disk or usb disk to overlay use it as extend storage to store more applications.

Default /etc/config/fstab

config 'global'
option	anon_swap	'0'
option	anon_mount	'0'
option	auto_swap	'1'
option	auto_mount	'1'
option	delay_root	'5'
option	check_fs	'0'

config 'mount'
option device '/dev/sda1'
option enabled '1'

config 'mount'
option device '/dev/mmcblk0p1'
option enabled '1'

This defined VoCore will mount sd disk or usb disk automatically.

If we want to attach SD disk as /overlay to enhance the application storage, we need add one line.

...

 config 'mount'
 option device '/dev/mmcblk0p1'
+option target '/overlay'
 option enabled '1'

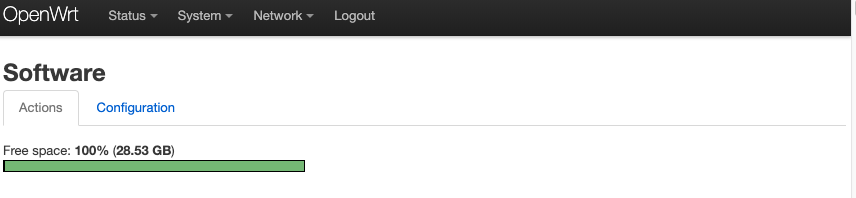
Then we will have a much bigger system disk.(call df show list)

Filesystem           1K-blocks      Used Available Use% Mounted on
/dev/root                 2816      2816         0 100% /rom
tmpfs                    62616       508     62108   1% /tmp
/dev/mmcblk0p1        29963132     45164  28372856   0% /overlay
overlayfs:/overlay    29963132     45164  28372856   0% /
tmpfs                      512         0       512   0% /dev
/dev/mmcblk0p1        29963132     45164  28372856   0% /mnt/mmcblk0p1

In LuCI it is looks like this:

Note: SD/USB storage file system better to be ext4. Other system should work too but might have some issues.

Extend Memory

This “extend memory” is not real memory, it is a swap buffer in SD disk or USB disk. To use it is very simple, just like we use swap in Linux.

Default firmware we already have necessary tools for swap.

  1. make an empty file(for example 128MB) as swap: dd if=/dev/zero of=/mnt/mmcblk0p1/swap bs=1M count=128
  2. setup it as swap file: mkswap /mnt/mmcblk0p1/swap
  3. add this swap to system: swapon /mnt/mmcblk0p1/swap
  4. check the swap: free
             total       used       free     shared    buffers     cached
Mem:        125232      98940      26292        888       3836      76424
-/+ buffers/cache:      18680     106552
Swap:       131068          0     131068


Screen: Framebuffer Driver Usage

New SDK comes(download at http://vonger.cn/misc/screen/v2screen.tar.xz). Also new port of DOOM, this time, it reaches its max speed, the app is not laggy anymore.

Now we have two versions. One is VoCore version which is big endian, other is DJN version which is little endian.

Big endian is hardware optimized for 24bit bitmap, so you can display 24bit bitmap directly by memory copy.

Little endian is mainly for 16bit bitmap, we use it for frame buffer, so Qt and SDL such library are easily run on it without modify any code.

The two versions are using same driver board.

How to use fbusb.ko

  1. first your firmware must support frame buffer driver, currently firmware after 20190301 support it already.  If you want to use it in your own firmware, you need to select in openwrt source code “make kernel_menuconfig” > Device Drivers > 

    Graphics support > Frame buffer Devices > Support for frame buffer devices.

  2. now your firmware is ready, use scp copy fbusb driver to your vocore2 /root folder. The driver is in screen SDK(http://vonger.cn/misc/screen/v2screen.tar.xz), lib/vocore2/ folder, its name is fbusb.xxxx.ko (xxxx is your screen type)
  3. final step is insert the ko file to your kernel. Call command insmod /root/fbusb.* , if everything works, after this you will find a frame buffer device at /dev/fb0.
  4. now we can test framebuffer, dd if=/dev/urandom of=/dev/fb0 bs=1000 count=768, then you can find random picture on the screen.