Monthly Archives: January 2019

Beginner: OpenWrt 18.06 stable version 6(final)

Now we already have the firmware, I also upload it to http://vonger.cn/misc/vocore2/20190127.bin

How to use upgrade to this firmware?

  1. Connect to VoCore2 by network: ethernet or wifi both is good.
  2. Open browser by 192.168.61.1, username root, password vocore.
  3. In the top menu, select System -> Backup/Flash firmware -> Uncheck ‘Keep settings’ -> Click ‘choose file’ under that checkbox, select 20190127.bin in your local folder -> Click on button ‘Flash Image…’
  4. In next page, md5 should be f4d08cca2b944abd4e4bedd273f1d3d8, then click ‘Process’.
  5. Upgrade is in process now, wait around five minutes, it will be done, do not power off your VoCore.

How to connect to other wireless network?

Normally I call it ‘AP+STA mode’, AP means VoCore2 will broadcast itself, so you can find its SSID “VoCore2-xxxx” in your computer or smart phone wifi list. STA means station mode, it is used to connect to other wireless router. For example, my home wireless router SSID is ‘KOKO’, so I can connect to it and cross internet through its network. AP + STA mode means I can broadcast VoCore2 SSID but same time we can connect to my home router, in another word, it is a bridge between computer and home router, so we call it bridge mode too.

In LuCI, it is pretty simple to setup:

  1. If you bootup VoCore2 for first time, you need to wait 5 minutes, first boot up VoCore2 need time to create rsa keys for ssh and initialize the on board flash.
  2. Connect to VoCore2 by network: ethernet or wifi both is good.
  3. Open browser by 192.168.61.1, username root, password vocore.
  4. In the top menu, select Network -> Wireless, in ‘Wireless Overview’ you can find three units: Generic WEXT 802.11,  SSID: VoCore2-xxxx, SSID:(empty).
    1. First one is ra0 setting, which is our wireless network card, do not modify it, I do not know what it is used to yet 🙂
    2. second one is AP setting, we can change VoCore2 broadcast SSID name and enable password WPA2 or other mode.
    3. Third one is STA setting, we can use it connect to other wireless router.
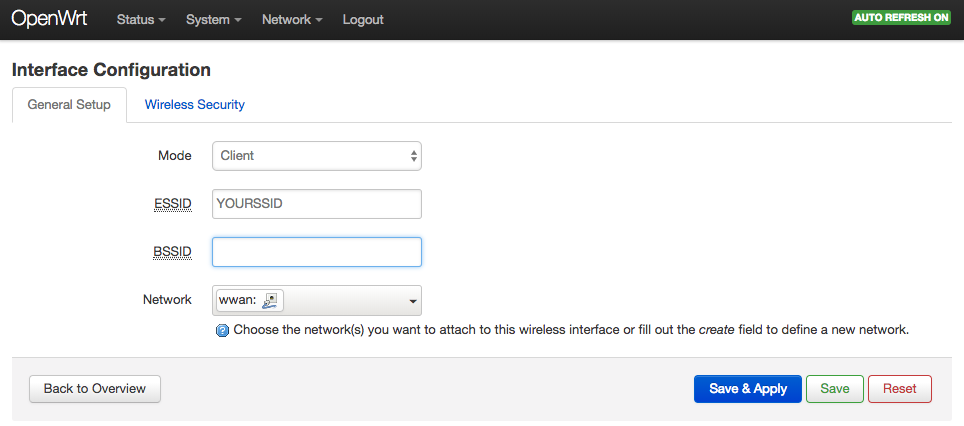
  5. Let’s connect to other wireless router for internet. Click the button ‘Edit’ in that line, in submenu ‘General Setup’, set ESSID to other wireless name, for me it is YOURSSID;then select submenu ‘Wireless Security’, select correct encryption and key for your router. 
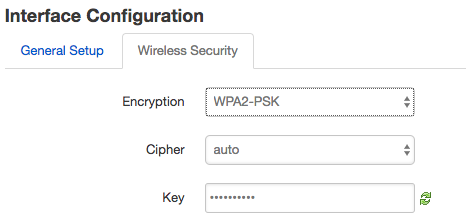
Now, setting is ready, do not click on the ‘Save & Apple’ or ‘Save’ or ‘Reset’ at bottom, click on the ‘Enable’  button after ‘Wireless network is disabled’, once click it will have a thirty seconds count down.
    1. if you connect to VoCore2 by ethernet, it will be done automatically.
    2. If you connect to VoCore2 by wireless, you need to connect your computer back to VoCore2 before count down end! Or your setting will be rollback, because once you click on the ‘Enable’ button, VoCore2 wireless network is restarted and you are disconnected.
    3. because of point 2, better to use ssh login and directly use vi modify /etc/config/wireless in VoCore2. remove ‘disable’ line in sta section and add ‘option ssid YOURSSID’ and add ‘option key yourpassword’ to sta section. Then reboot wifi it will work.
  6. Now all setting done, in top menu, select Network -> Interface, you can find in WWAN line, there is your alloc ip address. (If no such address, connect might fail, you need to reboot VoCore2 or check your password for your local router)

How to install package in VoCore2?

We are using openwrt 18.06.01, the benefit is it can directly download openwrt compiled packages from openwrt official website.

In LuCI it is pretty simple:

  1. make sure you have finished AP+STA mode, and VoCore2 is able to connect to internet.
  2. select top menu ‘System’ -> Software.
  3. You will find ‘No package lists available’ with a button ‘Update lists’
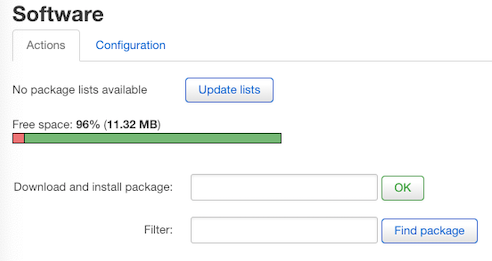
  4. click on ‘Update lists’, wait a few seconds, you have a completed package list which is used to install packages. (Make sure every feeds source passed its checking)
Downloading http://downloads.openwrt.org/releases/18.06.1/packages/mipsel_24kc/packages/Packages.gz
Updated list of available packages in /var/opkg-lists/openwrt_pack
Downloading http://downloads.openwrt.org/releases/18.06.1/packages/mipsel_24kc/packages/Packages.sig
Signature check passed.
Downloading http://downloads.openwrt.org/releases/18.06.1/packages/mipsel_24kc/routing/Packages.gz
Updated list of available packages in /var/opkg-lists/openwrt_rout
Downloading http://downloads.openwrt.org/releases/18.06.1/packages/mipsel_24kc/routing/Packages.sig
Signature check passed.
Downloading http://downloads.openwrt.org/releases/18.06.1/packages/mipsel_24kc/telephony/Packages.gz
Updated list of available packages in /var/opkg-lists/openwrt_tele
Downloading http://downloads.openwrt.org/releases/18.06.1/packages/mipsel_24kc/telephony/Packages.sig
Signature check passed.
Downloading http://downloads.openwrt.org/releases/18.06.1/targets/ramips/mt76x8/packages/Packages.gz
Updated list of available packages in /var/opkg-lists/openwrt_core
Downloading http://downloads.openwrt.org/releases/18.06.1/targets/ramips/mt76x8/packages/Packages.sig
Signature check passed.
Downloading http://downloads.openwrt.org/releases/18.06.1/packages/mipsel_24kc/base/Packages.gz
Updated list of available packages in /var/opkg-lists/openwrt_base
Downloading http://downloads.openwrt.org/releases/18.06.1/packages/mipsel_24kc/base/Packages.sig
Signature check passed.
Downloading http://downloads.openwrt.org/releases/18.06.1/packages/mipsel_24kc/luci/Packages.gz
Updated list of available packages in /var/opkg-lists/openwrt_luci
Downloading http://downloads.openwrt.org/releases/18.06.1/packages/mipsel_24kc/luci/Packages.sig
Signature check passed.

How to play music on VoCore2?

For play mp3 music, we need to install madplay-alsa.

  1. in System->Software page, type madplay in ‘Filter’ box, then click on ‘Find package’
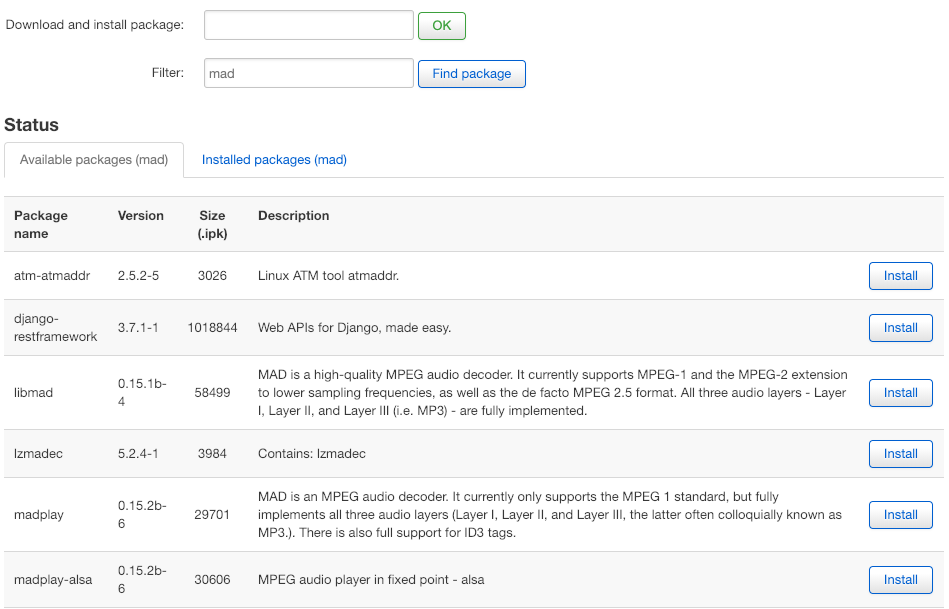
  2. You can find madplay-alsa in the package list, click on ‘Install’ to install it to your VoCore2.
  3. Insert a SD card or USB disk to your VoCore2, make sure it contains mp3.
  4. login to VoCore2 by ssh or serial port, run madplay [path to your mp3 file], then you will hear sound from the device who connected to 3.5mm the jack.

How can I access to VoCore2 (already setup STA mode) through my local network?

  1. Find your VoCore2 IP first, for example, mine is 192.168.31.71, it is in Network -> Interface.
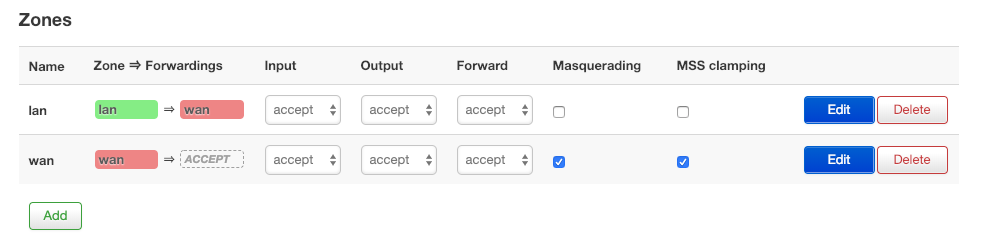
  2. We need to enable wan network access in firewall, it is in Network -> Firewall -> Zones, set wan Input/Forward from reject to accept.
  3. Now we can access VoCore2 through my local network by IP address 192.168.31.71.

Beginner: OpenWrt 18.06 stable version 5

Final puzzle piece for the firmware, the sound.

I spend some time to clean up my last patch, its works perfect now.

It is still all in http://github.com/vonger/vocore2.

patch openwrt first to enable sound setting in DTS(default it is off), and 810 patch is for linux kernel sound driver.

patch -p1 < ./package/kernel/es8388/openwrt/000-*.patch
cp ./package/kernel/es8388/openwrt/810*.patch ./target/linux/ramips/patches-4.14

note: this patch require patch ./package/kernel/mt7628/openwrt/000-vocore2-compatible.patch first.

In make menuconfig, Kernel modules -> Sound Support -> select kmod-sound-corec then kmod-sound-mt7628.
After you make again, now you have a perfect firmware for VoCore2 Ultimate, also very tiny, around 4096KB.

Beginner: OpenWrt 18.06 stable version 4

1,2,3 is enough for VoCore2, for VoCore2 Ultimate, we still missing a lot of drivers and app.

  1. sound driver, such as madplay, asound, arecord can be download from openwrt by opkg, so we do not imply them.
  2. camera driver, we include it this time.
  3. sdcard drive, this is necessary.
  4. file system driver, support vfat.
  5. tools such as lsusb, iperf3, do not imply, because it is easy to download by opk.
  6. mount-block for automatically mount usb or sd card.

For point 2, select Kernel modules => Video Support => select kmod-video-core, select kmod-video-uvc, it will be automatically supported, and we need mjpeg-stream, that can be easily download from openwrt, so we do not imply it this time.

For point 4, select Kernel modules => Filesystems => select kmod-fs-vfat, that’s all, all necessary depends package will be selected.

For point 3 and 6, select Kernel modules => Other modules => select kmod-sdhci-mt7620, also need to select Base system => select block-mount, it is not end, mmc and usb will not mount automatically, we still need one more file fstab to /etc/config/fstab. I have already include it into mt7628 patch 000, so once you install mt7628 patch everything will be ready already.

fstab should like this:

config 'global'
	option	anon_swap	'0'
	option	anon_mount	'0'
	option	auto_swap	'1'
	option	auto_mount	'1'
	option	delay_root	'5'
	option	check_fs	'0'

config 'mount'
	option	device	'/mnt/sda1'
	option	enabled	'1'

config 'mount'
	option  device  '/mnt/mmcblk0p1'
	option  enabled '1'

Now final point 1, I did not have a prefect patch yet, because it require a lot of patch and fix… Let me try tomorrow.

Beginner: OpenWrt 18.06 stable version 3

OK, now install luci for noobs 🙂

install LuCI for openwrt.

./scripts/feeds update luci
./scripts/feeds install -a -p luci

note: if you download speed is slow from openwrt.org, you can modify ./feeds.conf.default, change its ‘https://git.openwrt.org/feed/’ to ‘https://github.com/openwrt/’, then do it feeds update/install again, github should be much faster.

After this we have LuCI, as usual, patch it…
patch is at ./feeds/vocore2/mt7628/openwrt/luci/010-luci-vocore2-compatible.patch

note: this patch is to enable LuCI setting WPA2 for wireless.

This is for latest LuCI, so do not compatible with 18.06, need a little change, because some people change the folder name from luci-mod-admin-full to luci-mod-network. So we just change luci-mod-network in the patch back to luci-mod-admin-full.

After the change, now we can patch it, run patch in openwrt folder.


patch -p1 < ./package/kernel/mt7628/openwrt/luci/*.patch

Now make menuconfig, select LuCI -> Collections -> luci
Then compile, you will get firmware at ./bin/targets/ramips/mt76x8/openwrt-ramips-mt76x8-vocore2-squashfs-sysupgrade.bin

Beginner: OpenWrt 18.06 stable version 2

Continue…

Why we can not use official version:

1. its wifi is default disabled.
2. it do not have default password.
3. its wifi driver is not works well.

And point 1,2,3, openwrt do not allow me submit patch, because it will broken other device. Point 3 is pretty important, use official mt76 driver, wireless speed only 5~10Mbps, and frequently disconnect…

So as openwrt community suggested, I have to use external patch. Some patch like SD card fix etc that they allow to submit, already in the openwrt source code.

=================================================================

Now, we need to port mt7628 driver to replace official mt76 driver for better speed and experience.

PS: use non-official driver also brings new problem, because it do not support standard linux wireless interface, have to patch LuCI and iwinfo to make it work…that is a lot of work and bring in bugs. So best way is to fix that mt76 driver. I am trying, but it is very long code hard to read…

I have tutorial about how to imply mt7628 driver, it is at https://github.com/vonger/vocore2, just copy it here

How to use it
1. add this feeds to your openwrt source.

cd ~/openwrt
cp feeds.conf.default feeds.conf
echo src-git vocore2 https://github.com/vonger/vocore2.git >> feeds.conf
./scripts/feeds update vocore2
cp -r ./feeds/vocore2/mt7628 ./package/kernel

2. patch your openwrt with necessary patches to use this driver.

cd ~/openwrt
patch -p1 < ./package/kernel/mt7628/openwrt/000-*.patch

mkdir ./package/network/utils/iwinfo/patches
cp ./package/kernel/mt7628/openwrt/080-*.patch ./package/network/utils/iwinfo/patches

3. config mt7628 in make menuconfig Kernel modules -> Wireless Drivers -> kmod-mt7628
Target System: MediaTek Ralink MIPS
Subtarget: MT76x8 based boards
Kernel modules -> Wireless Drivers -> unselect kmod-mt76 / select kmod-mt7628 -> select WiFi Operation Mode -> enable AP-Client support for AP+STA mode; enable SNIFFER for monitor mode.
Base System -> select wireless-tools (need its iwpriv)
Network(option): unselect wapd-mini/hostapd-common (mt7628.ko already have WPA support)
Global build settings(option): Kernel build options -> /dev/mem virtual device support(enable /dev/mem for easy debug)
Global build settings(option): unselect Cryptographically signed package lists (this will block compile)

When apply the patch, there is an small warning: openwrt/target/linux/ramips/base-files/etc/board.d/01_leds
PS: It is because my patch is for latest trunk, so it not patch well.

just delete openwrt/target/linux/ramips/base-files/etc/board.d/01_leds.orig, and modify openwrt/target/linux/ramips/base-files/etc/board.d/01_leds

1. remove this if there is any:

vocore2)
set_wifi_led "$boardname:fuchsia:status"
;;
vocore2lite)
set_wifi_led "$boardname:green:status"
;;

2. keep this lines:

vocore2)
set_wifi_led "$boardname:fuchsia:status" "ra0"
;;
vocore2lite)
set_wifi_led "$boardname:green:status" "ra0"
;;

If you can not do this, please read some tutorials about “How to use patch”
Or lazy way, just remove 01_led patch from the pacth file in openwrt/package/kernel/mt7628/openwrt/000-vocore2-compatible.patch it will cause VoCore2 LED do not flash after wifi connected.

Finally, we can make, after that, we can get a firmware with mt7628 driver support.
PS: make will take hours, so be patient…

Beginner: OpenWrt 18.06 stable version 1

Actually there is a lot of tutorials already, but maybe we need to restart a full version. And some people just want to use the final firmware without compile, sooooo, anyway, OK, now let’s start compile 18.06 from scratch..

note: I assume you already have some knowledge about Linux and compile(such as gcc, makefile). If not, come back later, I will release a firmware, you can directly upgrade your VoCore2.

Prepare a develop environment, which is necessary 🙂
I have write this in vocore.io/v2.html

Prepare VM for VoCore2
video tutorial: https://youtu.be/ocl6yFtKSNs

1. install Ubuntu 14.04 64bit Server to Virtual Machine.

2. in virtualbox, we will need install some packages to compile openwrt:

sudo apt-get install gcc g++ binutils patch bzip2 flex bison make autoconf gettext texinfo unzip sharutils subversion libncurses5-dev ncurses-term zlib1g-dev libssl-dev python git

We need to compile from openwrt 18.06 stable version, need to get its source code, type this command in console of Ubuntu.

git clone https://github.com/openwrt/openwrt.git

It will show something like this:

Cloning into 'openwrt'...
remote: Enumerating objects: 19, done.
remote: Counting objects: 100% (19/19), done.
remote: Compressing objects: 100% (19/19), done.
remote: Total 452174 (delta 11), reused 0 (delta 0), pack-reused 452155
Receiving objects: 100% (452174/452174), 156.94 MiB | 8.31 MiB/s, done.
Resolving deltas: 100% (306772/306772), done.
Checking out files: 100% (8172/8172), done.

Now we have openwrt trunk in current folder, but we need to switch it back to old version v18.06.1, we need to use git.

git checkout v18.06.1

It is version 18.06.1 now, once we compile it, it is the ‘stable’ version.

call “make menuconfig”

note: for macos, already embed getopt, it will report error: –long do not support. so we need to install gnugetopt and add its path to $PATH to cover default system one.

now, we can select in menu:

Target System (MediaTek Ralink MIPS)
Subtarget (MT76x8 based boards)
Target Profile (VoCore VoCore2)

Exit and compile by make, we have the official version.
Official version wifi is not very good, have to continue the fix. 🙂

PS: VoCore2 and VoCore2 Ultimate both using “VoCore VoCore2” config, because they both have same 128MB memory and 16MB flash. VoCore2 Lite is 8MB flash and 64MB memory, so need to use other configure.

Beginner: OpenWrt 18.06 stable version

I think we need a stable version based on 18.06 for beginner 🙂
So this week I am going to work on a firmware. And I will also write how I do this to help beginner of openwrt.

Targets:

1. port mt7628 driver for 18.06.
2. port sound driver for 18.06.
3. fix possible SD card driver broken.
4. fix LuCI WPA2 encryption bug.
5. make it able to download/upgrade package by LuCI directly.

Once finish all of above, I hope it is easy for beginners to use. 🙂

PS: if you are a beginner and have questions, please email to support@vocore.io, we are glad to hear from you.

Tutorial: VoCore2+Screen Port Super Marie Bros.

The screen is ready and works pretty well, I am having a lot of fun 🙂

I am trying to port two version of NES simulators, one is LiteNES, another one is LaiNES. LiteNES is working pretty smooth but it has many bugs, some codes are broken; LaiNES is good and less bugs, but it is very very very slow, only 1/6 speed of LiteNES. I do not have much time to fix the bugs or optimize code. I guess it is a pretty funny process to fix it.

Here I explain how I port the two NES. Please download latest SDK of the screen(vocore.io/screen.html), in demo folder, we have a firmware with frame buffer driver, which is much easier for you port applications, or you can use the fbusb.ko driver to make your own.

fbusb.ko depends on framebuffer driver, usb driver and some sys_* draw function of framebuffer, please make sure every function is implied in kernel to make sure it works normal.

LiteNES requires to port keyboard and pixel display function.

To use framebuffer, here is my sample code.

void nes_hal_init()
{
	...

	// map framebuffer to local, so we can access it directly.
	int fd = open("/dev/fb0", O_RDWR);
	if (fd <= 0) {
		printf("frame buffer is not exist, exit.\n");
		exit(-1);
	}

	framebuffer = mmap(NULL, FBMAP_SIZE, PROT_WRITE, MAP_SHARED, fd, 0);
	if (framebuffer == NULL) {
		printf("can not map to frame buffer, exit.\n");
		exit(-1);
	}

	...

}

...

void nes_flip_display()
{
	if (framecount++ % 2)
		return;

	// directly write to middle of the frame buffer.
	memcpy(framebuffer + 144 * 480, local, LOCAL_SIZE);
}

I use a thread to handle the keyboard input…Maybe async is another better way, but its code might complex, so I make it easy.

Thread will update a key table, so app can directly read from the key table to get keys’ states.

void* keyboard_thread(void *arg)
{
	struct input_event ie;
	int kf;

	kf = open("/dev/input/event0", O_RDONLY);
	if (kf < 0) {
		printf("keyboard is not exist, input ignore.\n");
		return NULL;
	}

	while (1) {
		int size;
		size = read(kf, &ie, sizeof(struct input_event));
		if (size != sizeof(struct input_event))
			break;

		if (ie.type != EV_KEY || ie.code >= MAX_KEYCODE)
			continue;

		key_table[ie.code] = ie.value;
		if (ie.code == KEY_ESC)
			break;
	};

	close(kf);
	return arg;
}

PS: LiteNES is great but just bugs are weird, it has memory leak, no idea where it is but it write to the framebuffer area do not belong to it, should be the ppu engine issue.

PSS: source code here http://vonger.cn/misc/screen/LaiNES.tar.xz, http://vonger.cn/misc/screen/LiteNES.tar.xz